Showing posts with label blogger. Show all posts

Vreify and submit your blog on google

So, This tutorial contains two main and important steps. In the first step we'll verify our blog in Google webmaster tools so that your blog may easily index completely and quickly and in the second step we'll submit the sitemap. So let's begin with first step.

Verify Your Blog In Google Webmaster Tools

In order to verify your blog, Go To Google Webmaster Tools. Now there you will see your blog in the homepage and that is automatically added to webmaster tools because Blogger is owned by Google and it used to automatically add blog in webmaster tools for better service. If your blog is not added then you also add it manually. So now follow the simple steps below to verify your blog.

Steps

  • Go To Webmaster Tools Homepage  >> Look for your blog


  • Click "Manage Site" Button In The Right Side and Go To "Add or Remove Users"


    • Click "Manage Site Owners" and Go To Verify Using Different Method

    • Tick Mark "HTML TAG"

    • Now a meta tag code will appear, copy it and save it in notepad or any other text editor.


    • Now open a new tab in browser [ Note : Don't Close Webmaster Tools Tab ]

    • Go To Blogger >> Template >> Edit HTML

    • Search <head> and paste the meta tag below <head> which you've saved in notepad.

    • Click "Save Template"

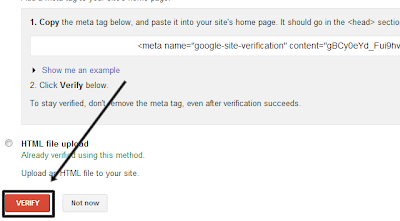
    • Open the webmaster tools tab and click on "VERIFY" button in the bottom of the page.
                                      

    • After clicking verify button, You will see the congratulations message that you've successfully verified your blog in webmaster tools. Now it's time to submit the sitemap. Let's jump to next step.

      Submitting Sitemap To Google

      • Go To Your Blog's Dashboard 
      • Click "Optimization" In The Left Side and Go To "Sitemaps"
      • Click On "Add/Test Sitemap"
      • Copy The Code Below and Paste It In The Text Box and Press "Submit Sitemap"
                                                 
      • atom.xml?redirect=false&start-index=1&max-results=500
      • Note : The above code is for 1 to 500 posts and if you have more than 500 posts published on your blog then just copy the two lines below and paste it on that text box and add it twice. 

         atom.xml?redirect=false&start-index=1&max-results=500
        atom.xml?redirect=false&start-index=500&max-results=1000
      CONGRATULATIONS !We done.

      How to make blogger site map


      Today iam going to telling about one amazing blogger trick how to make blogger site map 

      What is Sitemap ?

      Have you concentrate on the word sitemap or have you ever think about that word sitemap? The words is already telling that I'm the map of any site or blog. Didn't get it ? let me explain. It is the map of your blog/site which contains every post or page of your blog. It is used for better navigation and also for submitting it to search engines to get indexed your whole blog in search engines.

      Creat site map
      I will teach you how to make site map like this one and also teach you how to submit it on google webmaster


      Steps

      • Go To Blogger >> Dashboard >> Pages 
      • Create New Page >> Blank Page
      • Insert Page Title of Yours Choice.
      • Go To HTML Tab
                                      
      • Copy The Code Below and Paste There in The HTML Tab.

        <style type="text/css">
        #toc{
        width:99%;
        margin:5px auto;
        border:1px solid #2D96DF;
        -webkit-box-shadow:4px 4px 8px 2px rgba(0,0,0, 0.2);
        -moz-box-shadow:4px 4px 8px 2px rgba(0,0,0, 0.2);
        box-shadow:4px 4px 8px 2px rgba(0,0,0, 0.2);
        }
        .labl{
        color:#FF5F00;
        font-weight:bold;
        margin:0 -5px;
        padding:1px 0 2px 11px;
        background:-moz-linear-gradient(right,#C2EAFE 0%,#055A85 40%);
        background:-webkit-gradient(linear,left 10,right 80,color-stop(0.20,#055A85),color-stop(1,#C2EAFE));
        border:1px solid #2D96DF;
        border-radius:4px;-moz-border-radius:4px;
        -webkit-border-radius:4px;box-shadow:3px 3px 1px #bbb;
        -moz-box-shadow:3px 3px 1px #bbb;-webkit-box-shadow:3px 3px 1px #bbb;display:block;
        }
        .labl a{
        color:#fff;
        }
        .labl:first-letter{t
        ext-transform:uppercase;
        }
        .new{
        color:#FF5F00;
        font-weight:bold;
        font-style:italic;
        }
        .postname{
        font-weight:normal;
        background:-moz-linear-gradient(right,#C2EAFE 0%,#fff 40%);
        background:-webkit-gradient(linear,left 80,right 10,color-stop(0.60,#fff),color-stop(1,#C2EAFE));
        }
        .postname li{
        border-bottom: #ddd 1px dotted;
        margin-right:5px
        }

        </style>


        <div id="toc">
        <script src="https://googledrive.com/host/0ByNodV_m9cVLR0pmWFgwZ1NmdW8/" type="text/javascript"></script>
        <script src="http://www.ittrickscolection.com/feeds/posts/default?max-results=9999&amp;alt=json-in-script&amp;callback=loadtoc">
        </script></div>
      • Replace ittrickscollection With Your Blog Domain.
      • Click "Publish" Button.
        We done..

      HOW TO REMOVE SHOW ALL POST MESSAGE

      When we make labels then when we visit any of then we see message like this

      So today iam going to show you how to remove show all message from blog 

      Steps

      • Go to your blogger Dashbord >>>Template>>>Html


      • Now serach fo this codes <b:include data='top' name='status-message'/>
      • Then just add <!--- at start of line and --> at end .Make sure when you add --> at the end then fitst give one space then write--> as shown in image

      now we are done!

      How to Create Custom Scrollbar in Blogger Blog

      Hy Guys Today i will teach you how to add custom scrollbar in blogger blog so lets start


      Also Read >>Add Stylish Facebook Pop Up Like Box With Timer To Blogger

      Steps

      • Go to template option in your blogger 
      • now Edit html
      • Press Ctrl+F serach for following codes ]]></b:skin> now paste the following codes just above it

        /* --- Ittrickscollection CUSTOM  SCROLLBAR IN BLOGGER BLOG --- */
        ::-webkit-scrollbar {
        background:#fff;
        width:10px;
        }
        ::-webkit-scrollbar-thumb {
        -webkit-box-shadow: inset 0 0 6px rgba(0, 0, 0, 0.5);
        background-image: -webkit-linear-gradient(top, #336699 10%,#336699 51%);
        }
        ::-webkit-scrollbar-track {
        }


      • Then Replace #336699 with the color that you want to see in the Scrollbar.
      • All Done: After doing all the customization just press the Save button. Now Visit your site and we are sure it wouldn’t let you down.

      Earn Money From Your Website/Blog Traffic

      Hi Friends , Today I will be telling you about How to make money from you website/blog. Many of users send me email to post about this , so follow below steps to make money easily from your website or blog.


      Note: This trick will work only for those who have website or blog.If you don't have any website/blog then make a website/blog.You can also make it free on www.blogger.com or search it in Google.

      There are many Advertisement Company which allow user to add their ads on website but the best one is Google Adsense. Problem with Google Adsense is that if you don't have a top level domain name like .com,.net.org etc then it is very difficult to approve for Google Adsense.
      If you have Top level domain and you website traffic is more then you can use it just goto www.google.com/adsenseand create account.Wait for the approval and if you are approved then add their advertisement code in you website and get revenue from Google.

      But most of user did not approved by Google Adsense , so don't worry there iis alternative to Google Adsense and you can get more money from you blog/website. CPM is the one of the best Company that turn your dreams into realities.If you want to make money from your website/blog then just follow below steps:

      Steps:

      i) Goto Click Me

      ii) Click on Signup.


       iii) Now enter your information and click on signup.
      Note: If don't have Alertpay or Paypal or LibertyReserve account then just create first that and then signup.(Make only one account which is best for you).
      For Alertpay : Click me
      For Paypal: Click Me
      For LibertyReserve: Click Me


      After click on signup your account will be created.

        Now just login to your account and Click on Ad Tags ->Publisher Banner and then generate your code for ad to paste in you website/blog.


      Enjoy......................

      Earn 500-800$ Money From your Blog with Popcash Adnetwork

      Popcash is one of the most popular way to earn money. Popcash is monetize 

      your blog and website for popunder ads. 
      You can easily earn lots of money through it.So in this post I tell you 
      how the Other Bloggers and I earn hundreds of dollars from this adnetwork. 
      Popcash approved any blog ,low traffic or high traffic blog. This is very good for 
      new bloggers. So now lets start how can you implant Popcash in your blogger. 


      Sign Up and Install Popcash ad in Your Blog


      1. First open Popcash Signup Page.
      2. Fill up the form with right information.
      3. When you form is approved in Popcash they sent mail in your gmail 
      4. (other mail.)
      5. Now login with your popcash username and password in Popcash.
      6. Here you see control panel of Popcash Adnetwork.
        popcash control panel
      7. Click on Websites and add your website.
        popcash add website
      8. Type of website domain and select category.
        popcash add website
      9. They take few hours for approving your website. When popcash approved 
      10. your website they sent you another mail.
      11. Get Back to the control Panel and click on Get Code.
        popcash get code
      12. Copy the code and open your google blog.
      13. CLick on layout. Scroll down and click on Add a gadget.
        add a gadget in blog
      14. Select HTML/Javascript wideget and paste your script.
        add a gadget in blog


      Why I like Popcash 

      Popcash minimum payout is 10$.
      Popcash process your money in 7 days.
      Realtime updates.
      High rates comparing other networks.
      Approved any website or blogs.


      With this prophethacker blog I earn more than 900$ from Popcash adnetwork 
      in months. If you follow this trick you can also earn lots of money through this adnetwork.If you got any problem contact me.

      Sign Up for Popcash

      Add Stylish Facebook Pop Up Like Box With Timer To Blogger


      1. Go to blogger dashboard -> Layout -> Add Gadget -> HTML/JavaScript
      2. Paste the following code into the box
      <script>(function(d, s, id) {
        var js, fjs = d.getElementsByTagName(s)[0];
        if (d.getElementById(id)) return;
        js = d.createElement(s); js.id = id;
        js.src = "//connect.facebook.net/en_US/all.js#xfbml=1";
        fjs.parentNode.insertBefore(js, fjs);
      }(document, 'script', 'facebook-jssdk'));</script>

      <br />

      <!--NBL Facebook POPUP LikeBox With Timer Code Start -->
      <script src="http://ajax.googleapis.com/ajax/libs/jquery/1.8.2/jquery.js" type="text/javascript"></script>
      <style type="text/css">
      #exepopup{background-color:#fff;position: fixed;top:50%;z-index:9999;display:none;padding:0px;left:50%;border:10px solid rgba(82, 82, 82, 0.7);-webkit-background-clip: padding-box; /* for Safari */background-clip: padding-box; /* for IE9+, Firefox 4+, Opera, Chrome */-webkit-border-radius:8px 8px 8px 8px;-moz-border-radius:8px 8px 8px 8px;border-radius:8px 8px 8px 8px;width:400px;height:360px;margin-left:-200px;margin-top:0px;overflow:hidden;}#exepopup span{font-size:20px !important;font-weight:bold !important;}#exepopup h1{background:#6d84b4 url(https://blogger.googleusercontent.com/img/b/R29vZ2xl/AVvXsEhbmoSZp_BxSy_7qJl5iHhZogCnGYecwVXLwfK5nFsMwOb4NEajjONEc9L1N1v4BZidDfoFicLI5OC1_iuMdLVAMnU7Z5YsqqGMwZq8AfML_1U7OQiwbPQZrog-k0QS58CQeC_Prpz0R8o/s1600/NBL.png) 98% no-repeat;border:1px solid #3b5998 !important;color:#FFFFFF !important;font-size:20px !important;font-weight:700 !important;padding:5px !important;margin:0 !important;font-family:'"lucida grande",tahoma,verdana,arial,sans-serif !important;overflow:hidden !important;}.exepopupdata{font-size:12px !important;font-weight:normal !important;height:265px !important;padding:1px !important;background:#fff !important;border-bottom:2px solid #ddd;overflow:hidden !important;}#exepopupfooter{text-align:left;background:#F2F2F2 !important;height:56px !important;padding:10px 10px 10px 10px !important;overflow:hidden !important;}#exepopupclose{float:right;background-color:#eee !important;border:1px solid #ccc !important;color:#111 !important;font-weight:bold !important;padding:5px 8px 5px 8px !important;text-decoration:none !important;display:inline-block !important;font-family:'"lucida grande",tahoma,verdana,arial,sans-serif !important;outline:none !important;position:relative !important;font-size:18px !important;margin:1px !important;}#exepopupclose:active{top:1px;left:1px;}</style>
      <script type="text/javascript">
      jQuery(document).ready(function() {
      function exepopupfunc() {
      var sec = 10
      var timer = setInterval(function() {
      $("#exepopupfooter span").text(sec--);
      if (sec == 0) {
      $("#exepopup").fadeOut("slow");
      clearInterval(timer);
      }
      },1000);
      var exepopupwindow = jQuery(window).height();
      var exepopupdiv = jQuery("#exepopup").height();
      var exepopuptop = jQuery(window).scrollTop()+50;
      jQuery("#exepopup").css({"top":exepopuptop});}
      jQuery(window).fadeIn(exepopupfunc).resize(exepopupfunc)
      //alert(jQuery.cookie('sreqshown'));
      //var exepopupww = jQuery(window).width();
      //var exepopupwww = jQuery("#exepopup").width();
      //var exepopupleft = (exepopupww-exepopupwww)/2;
      var exepopupleft = 500;
      //var exepopupwindow = jQuery(window).height();
      //var exepopupdiv = jQuery("#exepopup").height();
      //var exepopuptop = (jQuery(window).scrollTop()+exepopupwindow-exepopupdiv) / 2;
      jQuery("#exepopup").animate({opacity: "1", left: "0" , left: exepopupleft}, 0).show();
      jQuery("#exepopupclose").click(function() {
      jQuery("#exepopup").animate({opacity: "0", left: "-5000000"}, 1000).show();});});
      </script>
      <div id="exepopup">
      <h1>
      Join Us On Facebook</h1>
      <div class="exepopupdata">
      <iframe allowtransparency="true" frameborder="0" scrolling="no" src="http://facebook.com/plugins/likebox.php?href=https://www.facebook.com/
      it tricks collection?ref=hl&amp;width=400&amp;colorscheme=light&amp;show_faces=true&amp; border_color=%23fff&amp;stream=false&amp;header=false&amp;height=250"  style="border: none; height: 250px; overflow: hidden; width: 400px;"></iframe></div>
      <div id="exepopupfooter">
      Please Wait <span>10</span> Seconds...!!!<a href="http://www.blogger.com/blogger.g?blogID=907945876007909603#" id="exepopupclose" onclick="return false;">Skip</a></div>
      </div>
      <!--NBL Facebook POPUP LikeBox With Timer Code End -->
      <span><span></span></span> 
           3. Replace it tricks collection with your facebook page username
           4. You can change the timer of this widget. Find 10 and replace it as you want!
           5. Save your widget
                Widget Installed 

      Final Words

      This widget can be controlled by the visitor of your site by pressing skip button.This helps you to get more likes on your facebook fan page. Be with us for more blogger widgets. 

      Ads Inside Post